
A complete SCADA deployment is more than just installing software. It involves the chain of components that lets a tag value travel from a physical input on the plant floor all the way up to a button on an operator screen, and back again. This guide demonstrates how a NODKA iPAC can communicate with Ignition Perspective via OPC UA, illustrating a practical industrial automation workflow.
What this guide delivers: in six concrete steps, a working Perspective HMI on a NODKA Panel PC that drives physical I/O on a NODKA EtherCAT module. The result is a practical evaluation workflow for exploring Ignition deployments on NODKA IPC platforms.
The goal is straightforward: take a 16-channel EtherCAT I/O bank connected to a NODKA iPAC, expose its variables via OPC UA, connect them to an Ignition Gateway running on a NODKA NP-6116, build a Perspective control panel, and deploy it to a NODKA Panel PC running Perspective Workstation in Kiosk Mode.
By the end of the walkthrough, toggling a switch on the Perspective Session will physically light an LED on the EtherCAT module, closing the loop between the field and the supervisory layer.
For a broader introduction to the NODKA IPC platforms that can be applied to Ignition architectures, see our companion article: Industrial IPC Platforms for Ignition SCADA Architectures.
Prerequisites: What You’ll Need
Before starting, confirm the following hardware and software are in place:
- Hardware: NODKA iPAC controller with EtherCAT I/O modules attached, NODKA NP-6116 Automation PC for the Ignition Gateway, NODKA Panel PC for the Perspective Workstation client, an Engineering PC for Ignition Designer, and Ethernet cables connecting them.
- Software: CODESYS Development System on the Engineering PC with the CODESYS Control runtime installed on the iPAC, the Ignition Gateway installed on the NP-6116, and Ignition Designer Launcher on the Engineering PC.
- Network: The iPAC, Gateway, and Panel PC on the same network segment with known IP addresses, and the default Ignition ports 8088 HTTP, 8043 HTTPS, and 8060 Gateway Network reachable.
Step-by-Step Integration
Step 1: Expose I/O Tags in CODESYS
The iPAC’s CODESYS Control runtime includes an OPC UA server that starts automatically. However, tags are only published if you tell CODESYS to include them in the Symbol Configuration.
- Verify the CODESYS Runtime service is active on the iPAC, shown by the green icon in the Windows system tray, and confirm your project is in RUN mode.
- In the CODESYS IDE on your Engineering PC, open Symbol Configuration.
- Enable the Build checkbox for every variable you want Ignition to see. In this demo, the 16-element output array is abMyOutputs.
- Download the updated project to the iPAC.
The tags are now published on the iPAC’s OPC UA endpoint at:
opc.tcp://<iPAC-IP>:4840Step 2: Connect Ignition to the iPAC’s OPC UA Server
On the NP-6116 Gateway, configure Ignition to consume the iPAC’s OPC UA data with proper certificate-based security. Ignition 8.3 introduces a redesigned Gateway Webpage with a streamlined OPC UA connection wizard.
- From the Ignition Gateway Webpage, typically http://<NP-6116-IP>:8088, go to Connections → OPC → Connections.
- Click Create OPC Connection +, choose OPC UA Connection from the list, and click Next.
- Enter the OPC UA endpoint URL for the iPAC:
opc.tcp://192.168.1.10:4840- Step through Server Discovery and Endpoint Selection.
- Choose the endpoint with the Basic256Sha256 security policy and SignAndEncrypt message security mode.
- When the Manage Certificate window appears, trust the iPAC’s server certificate and click Next.
- On the Configure Connection page, give the connection a name, such as NODKA_iPAC, then click Create OPC Connection.
The status should display as Connected on the OPC Connections page. The Gateway is now reading live OPC UA data from the iPAC.
Step 3: Import the iPAC Tags into Ignition Designer
With the device connection live, pull the tags into your Ignition project so they can be bound to UI components.
- Open the Ignition Designer Launcher on the Engineering PC.
- Connect to the NP-6116 Gateway and open or create your project.
- In the Tag Browser, click the + icon and choose Browse Devices.
- Locate the OPC UA connection you created in Step 2, expand the iPAC device, and find the abMyOutputs array.
- Drag abMyOutputs_0_ through abMyOutputs_15_ into the default tag provider.
The 16 output tags now live in the Ignition tag database, ready to bind to Perspective components.
Step 4: Build the Perspective Control Panel View
This is where the SCADA visualization comes together.
- In the Designer’s Project Browser, expand Perspective → Views.
- Right-click the Page folder and create a new view named ControlPanel with a Coordinate root container.
- Configure page routing by clicking the gear icon next to Perspective.
- Add a new Page URL /controlpanel and set the Primary View to Page/ControlPanel.
Plan the two control zones by mapping the 16 tags to physical equipment:
| Switches | Wiring / Zone |
|---|---|
| A0–A7 | Blue wiring, Conveyor Zone |
| B0–B7 | Orange wiring, Fluid Control Zone |
The Coordinate container preserves exact pixel positions for graphics, which is useful when the final HMI is a fixed-resolution Panel PC.
Step 5: Configure Multi-State Buttons and Equipment Bindings
The control panel uses two binding patterns: an expression binding for dynamic button colors, and a bidirectional binding for equipment symbols.
- Drag abMyOutputs_0_ from the Tag Browser onto the canvas and select Toggle Switch.
- In the Property Editor, bind props.style.backgroundColor using an expression binding:
if({[default]abMyOutputs_3_},
   "#EAEAEA",                        // Emergency Stop override
   if({[default]abMyOutputs_0_},
      "#00FF00",                     // Active (true): green
      "#0059A1"                      // Inactive (false): blue
   )
)- Copy the configured button using Ctrl+C / Ctrl+V.
- Update each duplicate’s props.selected binding to the next tag: abMyOutputs_1_, abMyOutputs_2_, and so on through abMyOutputs_15_.
- From Perspective Components → Symbols, drag a Motor onto the canvas.
- Bind its props.state to [default]abMyOutputs_0_.
- Apply a Map transform on props.value.text so true displays 100% and false displays 0%.
- Repeat with Pump, Valve, and Mixer symbols bound to the orange-zone tags.
- Save the project, then test from Tools → Launch Perspective → Launch Session.
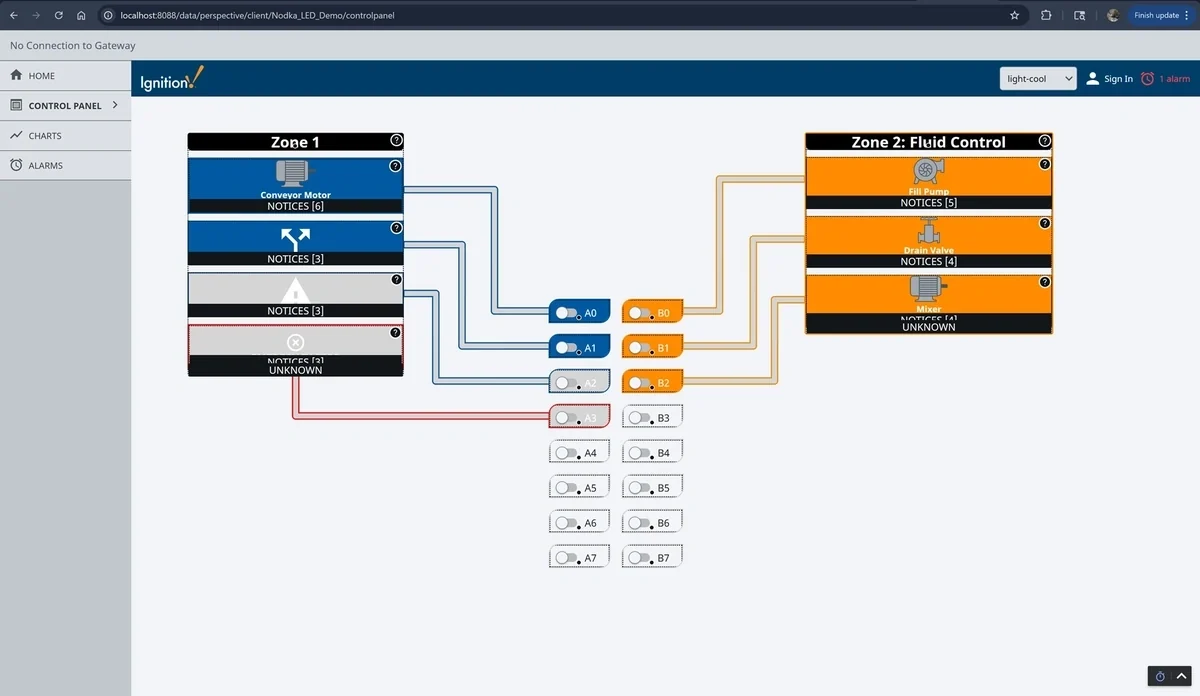
Perspective ControlPanel view live in the Designer, showing Zone 1 Conveyor and Zone 2 Fluid Control.
Step 6: Deploy to the NODKA Panel PC in Kiosk Mode
The final step demonstrates deployment to an operator station as a locked-down Perspective Session.
- On the NODKA Panel PC, open a browser to http://<NP-6116-IP>:8088 and download Perspective Workstation for the Panel PC’s OS. Windows is used in this demo.
- In Ignition 8.3, Workstation can also be launched via a Deep Link directly from the Gateway Webpage without opening a separate launcher.
- Run the installer and launch Perspective Workstation on the Panel PC.
- Add a new Application entry in Perspective Workstation pointing to the NP-6116 Gateway.
Configure the application as follows:
- Name: NODKA Control Panel
- Project: Your demo project
- Startup URL: /controlpanel
- Kiosk Mode: Enabled
Launch the Application. Workstation transitions from Windowed Mode to full-screen Kiosk Mode, locking the screen to the operator interface.
When an operator taps the A0 toggle on the Panel PC, the Conveyor Motor symbol turns green and the corresponding output LED on the iPAC’s EtherCAT module physically lights up, providing bidirectional control over OPC UA, end to end.
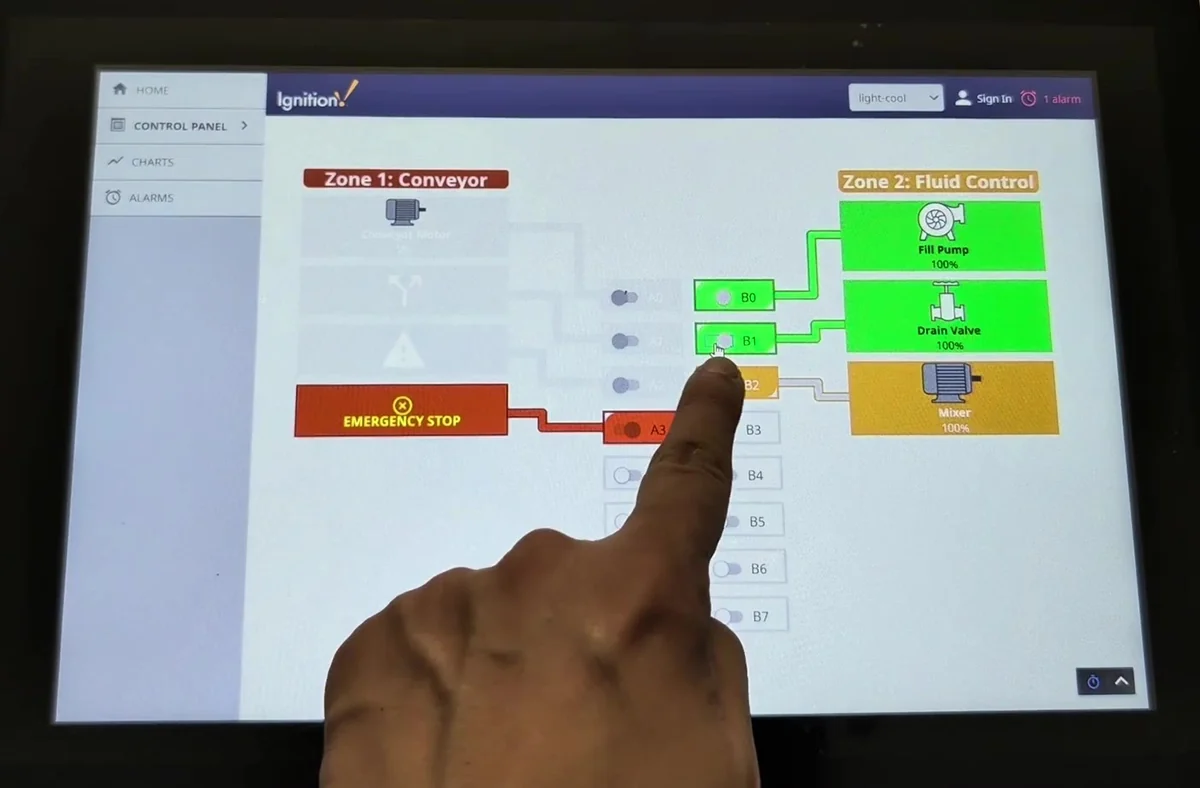
Operator interacting with the kiosk-mode HMI, with Zone 1 active and Emergency Stop interlock engaged on A3.
Troubleshooting
| Symptom | Possible Cause | Solution |
|---|---|---|
| Cannot connect OPC UA from Gateway | Wrong iPAC IP, firewall, or un-trusted certificate | Verify the iPAC IP, check firewall rules, and ensure the iPAC certificate is trusted in Ignition’s OPC UA settings. |
| Tags exist but show Bad/Stale quality | CODESYS project not in RUN, or Symbol Configuration out of date | Confirm the iPAC is running the project, re-check the Build box in Symbol Configuration, and download again. |
| On-screen toggles work but physical LEDs do not change | Incorrect binding direction on props.selected | Verify props.selected is bound bidirectionally to the correct [default]abMyOutputs_X_ tag. |
The Integrated Advantage
The strength of this architecture is that every layer relies on open industrial standards, including EtherCAT for I/O, OPC UA for data exchange, and Ignition’s hardware-agnostic SCADA platform, running on NODKA IPC platforms designed for continuous industrial operation.
From this single-cell example, the same pattern can be extended outward: additional iPAC edge nodes connecting into the same Gateway, additional Panel PCs subscribing to the same Perspective project, and one Designer used by the engineering team to manage them.
Ready to Put This into Practice?
This walkthrough reflects the evaluation workflow NODKA uses when demonstrating open industrial architectures on NODKA IPC platforms. For the complete reference package, which covers installing the Ignition Gateway, setting up the Designer Launcher, and the full iPAC integration walkthrough with every screenshot, ask our team for a full NODKA + Ignition Demo Guide.
If you would like evaluation units, OEM customization, or technical inquiries about applying NODKA IPC platforms to Ignition deployments, reach out to our team at [email protected].